Long exposure machine
Using a 3D printer with a LED attached to the extruder to create long exposure photos.
Tech: Python, Raspberry Pi, 3D printer
Tags: <1k lines of code
Source: https://github.com/dsonyy/light-printer
What is it?
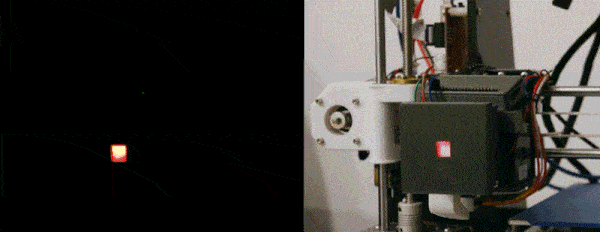
Light Printer is a small project developed with love for long exposure photos. The program originally works on Raspberry Pi, which sends G-code commands directly to the Anet A8 3D-printer. The printer doesn’t print anything, but it is used as some kind of vertical plotter. There is a RGB LED on the front part of the extruder, which is also controlled by Raspberry. The camera captures every blink of light with a long exposure in a very dark room. Everything works closely together in an effort to produce a correct picture.
Gallery


How to run it?
Please note that this code is written only for Anet A8 3D printer. I haven’t tested it for any other printers, so it would have to be adjusted a little bit.
Requirements
- Anet A8 printer - but actually, it could be anything, which is G-code programmable and allows you to put a LED box on its head.
- Raspberry Pi - or something with GPIO ports and Python.
- A camera with (very) long exposure photos - 30s exposure may be a too short period of time. An average photo needs a few minutes to be drawn completely.
- A box with a small hole and RGB LED inside - we have to be sure that every shot of a single photo’s pixel will se sharp. I have prepared some 3D-printable models to store LED which are ready to be used with Anet A8.
First run
- Install Python requirements from
requirements.txton your Raspberry Pi. - Connect the printer to your Raspberry Pi using USB.
- Run
sudo pigpiodto initialize GPIO ports (if you reboot RPi you will need repeat this step again). - Run
lightprinter.py. - There should be a list of available serial ports. If you see your printer’s one, type its name.
- Follow the instructions to “draw” an image.
Input images
Input images should be located inside the input directory. They may not contain transparent pixels. To speed up printing empty pixels should be black #000000, so they will be skipped.
Constants
If you have a look inside lightprinter.py there are some constants which are suitable for my setup:
LIGHT_TIME- Time of a single pixel lighting [sec]Z_SLEEP_PER_MM- Used to calculate the time from sending vertical move command to turning on the LED* [sec/mm]X_SLEEP_PER_MM- Used to calculate the time from sending horizontal move command to turning on the LED* [sec/mm]Z_STEP- Vertical step size [mm]-
X_STEP- Horizontal step size [mm] PIN_RED,PIN_GREEN,PIN_BLUE- GPIO pins for LEDs.
* If the program sends move command to the printer, it takes some time to physically move the extruder. So that, we need to wait a bit until the extruder is in the right place. The final delay time equals to X_STEP * X_SLEEP_PER_MM for horizontal movement and Z_STEP * Z_SLEEP_PER_MM for vertical.
Camera settings
Long exposure time depends on the image size. Every input image row adds additional seconds, so it usually takes a few minutes to make a whole picture. The most importat thing is there must be a fully dark room because every single light may be visible on the final picture.
To create the pictures from the gallery section I used F3.2 and F3.5 shutter, ISO 100 and manual exposure time.